

This guide explains how to configure OpenCTI to allow AiStrike to connect via the OpenCTI GraphQL API. You will create a dedicated role, group, and service account, then generate an API token that AiStrike will use to securely ingest threat intelligence data from your OpenCTI instance.◼︎
Overview
AiStrike connects to OpenCTI using a dedicated service account authenticated via a Bearer API token. This approach keeps integration access separate from individual user accounts, making it easy to audit, rotate credentials, and revoke access independently.
Permissions in OpenCTI flow from Role → Group → User. You will configure them in this order:
-
Create a dedicated AiStrike role with the required permissions.
-
Create a dedicated AiStrike group.
-
Assign the role to the group.
-
Create a dedicated AiStrike service account user.
-
Add the user to the group.
-
Generate an API token for the service account.
-
Verify network connectivity.
-
Test API authentication.
This order is important. Complete each step fully before moving to the next.
Prerequisites
Before starting, ensure the following are in place:
-
Administrator access to your OpenCTI instance.
-
An AiStrike account with Integrations access.
-
Your OpenCTI instance URL (e.g.
https://opencti.yourcompany.com). -
If self-hosted: network access from AiStrike IPs to your OpenCTI instance on TCP 443. The AiStrike egress IPs are listed in Step 7.
Required Connection Details
You will need the following information to complete the AiStrike connector configuration in Step 8. Collect these as you work through the guide.
|
Parameter |
Description |
Example |
|---|---|---|
|
OpenCTI URL |
Base URL of your OpenCTI instance |
https://opencti.company.com |
|
GraphQL Endpoint |
API endpoint — always /graphql appended to the base URL |
https://opencti.company.com/graphql |
|
API Token |
Generated in Step 6 |
opencti_xxxxxxxxxxxx |
|
Service Account Email |
Email used for the integration user |
aistrike-opencti@company.com |
What AiStrike Ingests from OpenCTI
Once configured, AiStrike will ingest and correlate the following data from your OpenCTI instance:
|
Threat Intelligence |
SOC / Detection Data |
|---|---|
|
Threat Actors
|
Incidents
|
Step 1 — Create the AiStrike Role
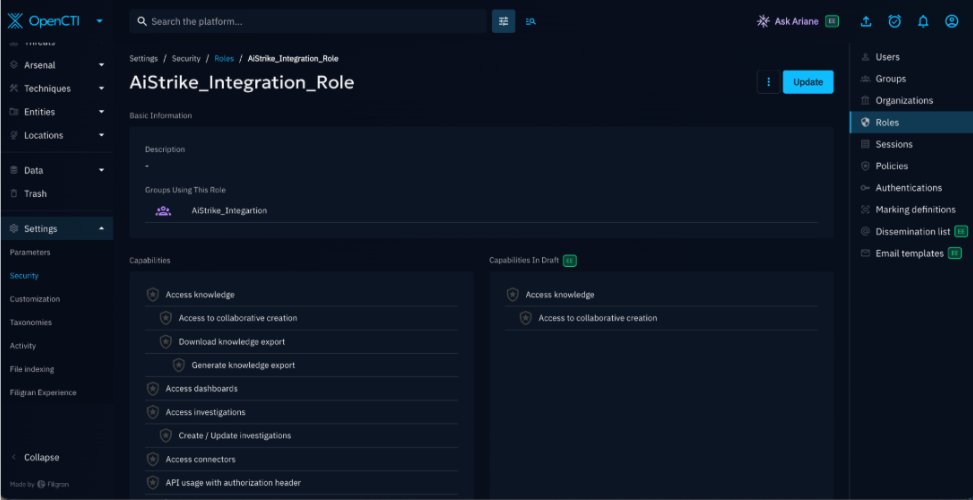
Create a dedicated role that defines exactly what AiStrike can access in OpenCTI. Roles control which capabilities are available to users who inherit them via a group.
Navigation
Settings → Security → Roles → + Create Role
Steps
-
In the OpenCTI left navigation, click Settings.
-
Under Security, click Roles.
-
Click + Create Role.
-
Enter the Role Name: AiStrike-Integration-Role
-
Assign the permissions listed in the tables below.
-
Click Save.
Required Permissions
Enable all six permissions listed below. These are the minimum required for AiStrike to function correctly.
|
|
Permission Name |
Enable? |
What it allows AiStrike to do |
|---|---|---|---|
|
1 |
Access knowledge |
Yes |
Read incidents, indicators, observables, reports, malware, threat actors, MITRE ATT&CK, and vulnerabilities |
|
2 |
API usage with authorization header |
Yes |
Enables Bearer token authentication for all API requests |
|
3 |
Allow token usage |
Yes |
Allows the service account to authenticate using an API token |
|
4 |
Access investigations |
Yes |
Read access to incidents and investigations / cases |
|
5 |
Download knowledge export |
Yes |
Retrieve and export knowledge objects and reports for AiStrike workflows |
|
6 |
Access connectors |
Yes |
Enables connector visibility for customer environment integration scenarios |
Optional Permissions
Enable these only if the specific use-case applies to your deployment.
|
|
Permission Name |
Enable? |
When to enable |
|---|---|---|---|
|
|
Access dashboards |
Optional |
Enable if dashboard metrics and reporting visibility is needed |
|
|
Access PIR |
Optional |
Enable only if Priority Intelligence Requirements (PIR) are used in your OpenCTI deployment |
|
|
Generate knowledge export |
Optional |
Enable for advanced export workflows beyond standard read access |
|
|
Access security activity |
Optional |
Enable if audit logs or security activity visibility is required |
Save before proceeding
Click Save after configuring all permissions above. Verify the AiStrike-Integration role appears in the Roles list under Settings > Security > Roles before moving to Step 2.
Step 2 — Create the AiStrike Group
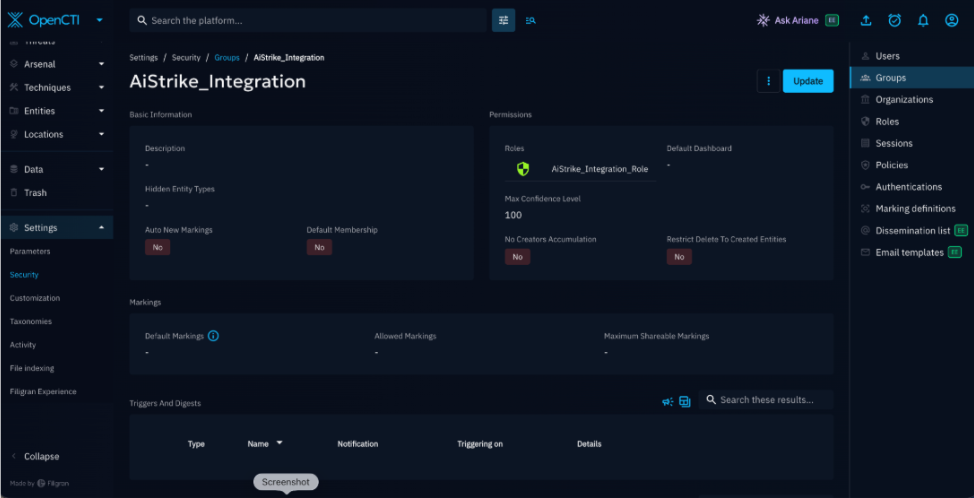
Create a dedicated group for AiStrike. The group is the link between the role (which defines permissions) and the user (which owns the API token). This structure means any user added to the group automatically inherits the correct permissions.
Navigation
Settings → Security → Groups → + Create Group
Steps
-
Under Settings > Security, click Groups.
-
Click + Create Group.
-
Enter the details below.
-
Click Save.
|
Field |
Value |
|---|---|
|
Group Name |
AiStrike-Integration-Group |
|
Description |
OpenCTI API access for the AiStrike integration service account |
Step 3 — Assign the Role to the Group
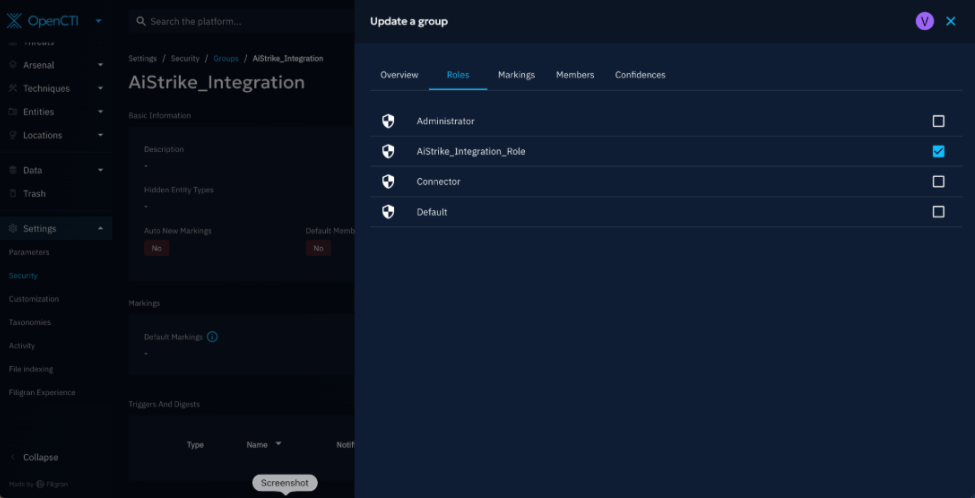
Assign the AiStrike-Integration role to the AiStrike-Integration group. This is what grants the permissions to any user added to the group in Step 5.
Navigation
Settings → Security → Groups → AiStrike-Integration → Roles tab
Steps
-
Under Settings > Security, click Groups.
-
Click the AiStrike-Integration group created in Step 2.
-
Open the Roles tab.
-
Add the AiStrike-Integration-Role role created in Step 1.
-
Click Save.
How permissions flow
Once this step is complete, the permission chain is: AiStrike-Integration Role → AiStrike-Integration Group → Service Account User. Any user added to the group will automatically inherit all role permissions without needing manual assignment.
Step 4 — Create the AiStrike Service Account
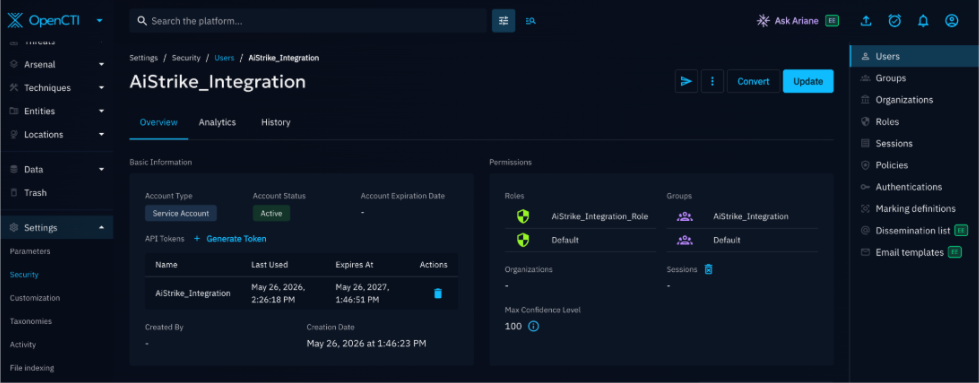
Create a dedicated OpenCTI user that AiStrike will use to authenticate. This should be a service account not tied to any individual employee, so that the integration continues working even when team members change.
Navigation
Settings → Security → Users → + Create User
Steps
-
Under Settings > Security, click Users.
-
Click + Create User.
-
Enter the details from the table below.
-
Set a strong password and store it securely in a password manager or secrets vault.
-
Click Save.
|
Field |
Recommended Value |
Notes |
|---|---|---|
|
First Name |
AiStrike |
|
|
Last Name |
Integration |
|
|
|
aistrike-opencti@yourcompany.com |
Use a shared mailbox, not a personal address |
|
Username |
AiStrike-Integration-User |
A clear service account name makes it easy to identify in audit logs |
|
Password |
Strong auto-generated password |
Store in a secrets vault. The password is not used directly by AiStrike but is required to create the account. |
Naming recommendation
Use a clear, identifiable service account name such as svc-aistrike-opencti. This makes the integration account immediately recognisable in audit logs, active sessions, and user management views.
Step 5 — Add the User to the Group
Add the service account created in Step 4 to the AiStrike-Integration group. This is what grants the user the permissions defined in Step 1.
Navigation
Settings → Security → Users → AiStrike Integration → Groups tab
Steps
-
Under Settings > Security, click Users.
-
Click the AiStrike Integration user created in Step 4.
-
Open the Groups tab on the user profile.
-
Add the AiStrike-Integration-group>update>members
-
Make sure the role(AiStrike_Integration_Role) and members(AiStrike_Integration_User).
-
Click Save.
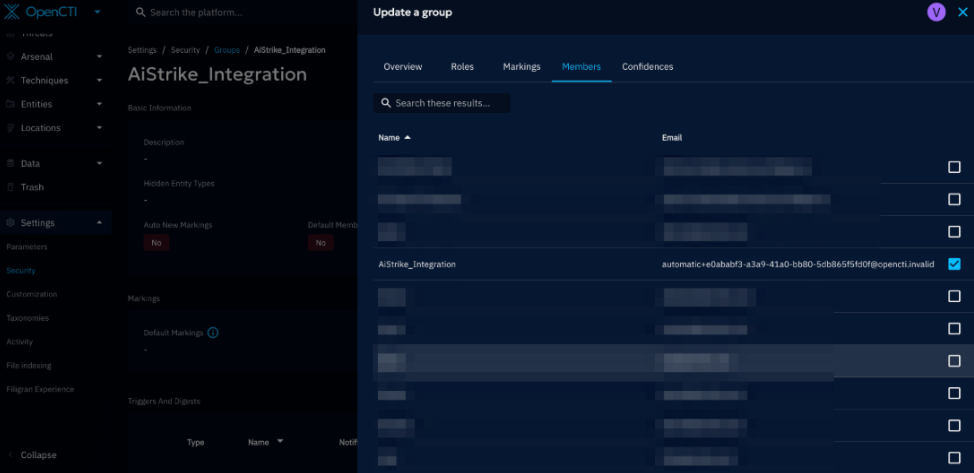
Once saved, the complete permission chain is in place:
AiStrike_Integration_User (User)
↓
AiStrike-Integration-Group (Group)
↓
AiStrike-Integration-Role (Role)
Step 6 — Generate the API Token
Generate an API token for the AiStrike service account. This token is what AiStrike uses to authenticate every request to your OpenCTI instance.
Navigation
Settings → Security → Users → AiStrike Integration → Profile → API Access → Create Token
Steps
-
Open the AiStrike Integration user profile.
-
Navigate to the API Access or Account Settings section.
-
Click Create Token.
-
Enter the token name: AiStrike Integration Token
-
Click Create / Confirm.
-
Copy the full token value immediately and store it in a password manager or secrets vault.
-
Click Done / Close.
Copy the token now — this is your only opportunity
OpenCTI may display the token value only once at the moment of generation. Once you navigate away, the token cannot be retrieved. If you lose it, you must delete the token and generate a new one. Store the copied token in a secure secrets vault and share it with the AiStrike team via a secure channel only.
Token Format
Depending on your OpenCTI version, the token will appear in one of the following formats:
|
OpenCTI Version |
Token Format |
Example |
|---|---|---|
|
OpenCTI 5.x and earlier |
UUID format |
opencti_xxxxxxxxxxxxxxxxxx |
|
OpenCTI 6.x and later |
New token format |
flgrn_octi_tkn_xxxxxxxxx |
Not sure which version?
Run the validation query in Step 8. The response will include the OpenCTI version number under the about.version field.
Step 7 — Network & Connectivity Requirements
This step applies only if OpenCTI is self-hosted or behind a firewall. If you are using OpenCTI Cloud (SaaS), skip to Step 8.
What AiStrike Needs to Reach
AiStrike communicates with OpenCTI exclusively via the GraphQL API endpoint:
-
Endpoint:
https://<your-opencti-domain>/graphql -
Protocol: HTTPS
-
Port: TCP 443 (standard HTTPS). If your deployment uses a non-standard port (e.g. TCP 8080 for internal deployments), ensure that port is open.
Firewall / Security Group Rules
Allow inbound HTTPS traffic to your OpenCTI instance from the following AiStrike egress IP addresses. All IPs use /32 notation (single host).
|
Direction |
Protocol |
Port |
Purpose |
|---|---|---|---|
|
Inbound to OpenCTI |
HTTPS / TCP |
443 |
Standard AiStrike API access |
|
Inbound to OpenCTI |
HTTP / TCP |
8080/other port you are using |
Internal deployments only — if applicable |
AiStrike Egress IP Addresses
Allowlist all of the following IP addresses in your firewall. All are /32 (single host) entries.
|
# |
IP Address |
Protocol / Port to Allow |
|---|---|---|
|
1 |
3.14.192.137/32 |
HTTPS / TCP 443 |
|
2 |
3.135.165.25/32 |
HTTPS / TCP 443 |
|
3 |
3.148.24.98/32 |
HTTPS / TCP 443 |
|
4 |
3.148.93.249/32 |
HTTPS / TCP 443 |
|
5 |
13.201.28.59/32 |
HTTPS / TCP 443 |
|
6 |
18.223.178.199/32 |
HTTPS / TCP 443 |
|
7 |
52.15.138.222/32 |
HTTPS / TCP 443 |
|
8 |
54.220.227.162/32 |
HTTPS / TCP 443 |
|
9 |
54.246.180.34/32 |
HTTPS / TCP 443 |
|
10 |
63.35.37.74/32 |
HTTPS / TCP 443 |
Step 8 — Validate API Connectivity
Before configuring the AiStrike connector, verify that the API token and network connectivity are working correctly. Connect with your Customer Success representative for this.
Credentials to Share with AiStrike
Once all steps are complete and the test in Step 8 passes, share the following information with the AiStrike team to complete the connector setup. Always share credentials via a secure channel such as a password manager or secrets vault — never via plain email.
|
Field |
Description / Where to Find It |
Required |
|---|---|---|
|
Connector Name |
A label for this connection in AiStrike (display only) |
Required |
|
OpenCTI URL |
Your OpenCTI base URL, e.g. https://opencti.yourcompany.com |
Required |
|
GraphQL Endpoint |
Base URL + /graphql, e.g. https://opencti.yourcompany.com/graphql |
Required |
|
API Token |
Generated in Step 6 — the full token value, not the token name |
Required |
|
Service Account Email |
The email used to create the service account in Step 4 |
Required |
Support
If you encounter issues not covered in this guide, contact the AiStrike team:
-
Enterprise customers — contact your AiStrike Customer Success Manager.
-
When contacting support, please have ready: your OpenCTI instance URL, the OpenCTI version number (visible in the Step 8 test response), and a description of the error or behaviour observed.
Confidential — For authorised recipients only.