

This guide provides step-by-step instructions for creating an Azure App Registration with the required API permissions and granting admin consent. It also includes the necessary permissions for the user performing this setup.◼︎
Prerequisites
Ensure the following requirements are met before proceeding:
Required Azure Access
The person creating the app registration should have the following roles at the subscription level/management group:
-
Global Administrator
-
User Access Administrator (or higher) at the Management Group level
Console-Based Steps
Step 1: Log in to Azure
Using Azure Portal:
-
Navigate to the Azure Portal.
-
Sign in with an account that has the required permissions.
Step 2: Create an App Registration
Using Azure Portal:
-
Go to Microsoft Entra ID.
-
Click on App registrations under Manage [left menu].
-
Click on New registration.
-
Enter a name for the application (e.g.,
AiStrikeAppRegistration). -
Choose:
-
Single Tenant (Accounts in this organizational directory only - Default Directory)
-
Multi-Tenant (Accounts in any organizational directory - Any Microsoft Entra ID tenant)
-
-
Click Register.
📷 [Screenshot slot: New App Registration]
Step 3: Assign API Permissions
Using Azure Portal:
-
Open the newly created App Registration.
-
Go to API Permissions → Add a permission.
-
Select Microsoft Graph → Application permissions.
-
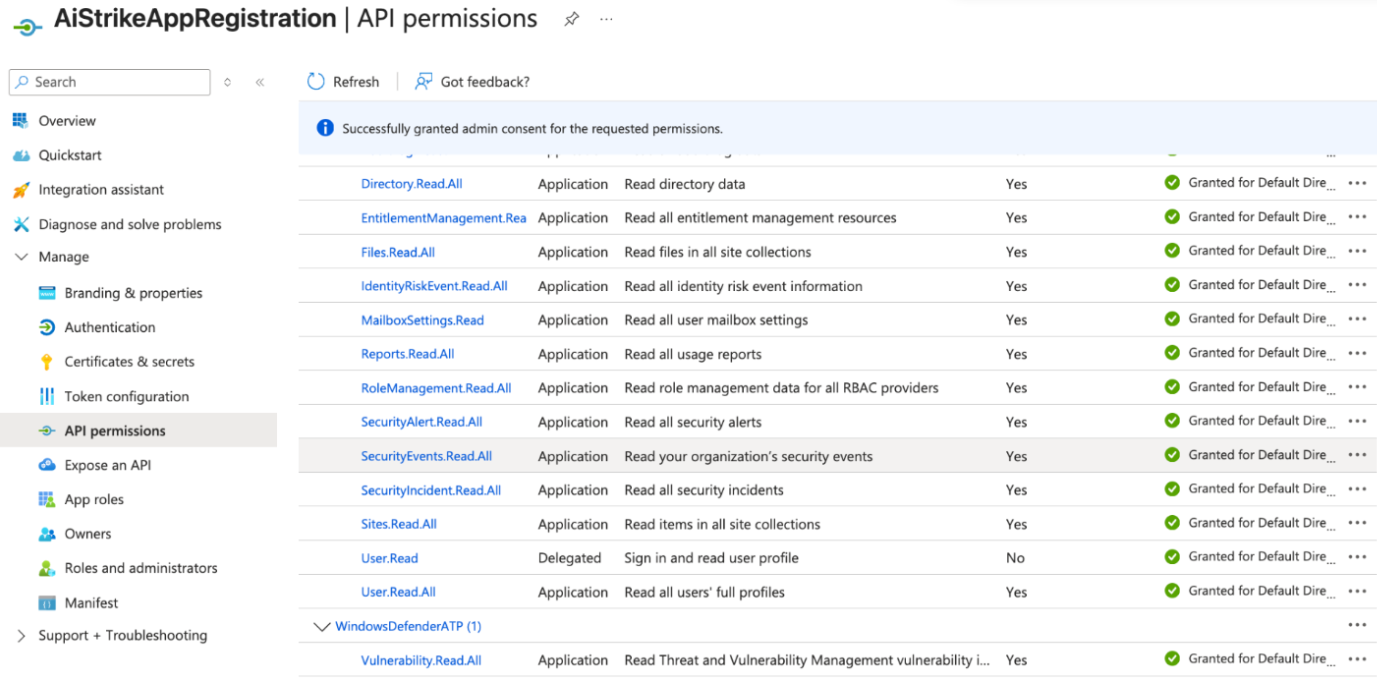
Add the following permissions: [use search box or select manually]
-
Application.Read.All
-
Directory.Read.All
-
EntitlementManagement.Read.All
-
RoleManagement.Read.All
-
User.Read.All
-
SecurityEvents.Read.All
-
SecurityAlert.Read.All
-
Reports.Read.All
-
AuditLog.Read.All
-
MailboxSettings.Read
-
SecurityIncident.Read.All
-
Sites.Read.All
-
Files.Read.All
-
IdentityRiskEvent.Read.All
-
Below, Permission comes by default as Delegated permissions:
-
User.Read
To allow the AiStrike system to collect vulnerability information:
Please navigate to the path API Permissions → APIs my organization uses → Application Permissions → Search for the "Windows DefenderATP" and search below and select the permissions:
-
Vulnerability.Read.All
-
Machine.Read.All
-
Software.Read.All
-
Alert.Read.All
-
Click Grant admin consent and confirm.
-
Expected Status After Granting Consent: After successfully granting admin consent, the status for the API permissions should display: "Granted for [Tenant Name]" (e.g., "Granted for Default Directory").
Steps to Grant Admin Consent in Azure Portal
1. Navigate to App Registrations
-
Go to the Azure Portal.
-
Search for Microsoft Entra ID and click on it.
-
In the left menu, click App registrations.
-
Locate and click on the newly created App Registration (e.g.,
AiStrikeAppRegistration).
2. Open API Permissions
-
In the App Registration menu, click API permissions.
-
You will see a list of requested permissions with a status of "Not Granted for <Tenant Name>" under Admin consent required.
3. Grant Admin Consent
-
Click on Grant admin consent for <Tenant Name>.
-
A confirmation prompt will appear—click Yes.
-
Wait for the process to complete (this may take a few seconds).
-
Ensure that the Status column now shows Granted for <Tenant Name>.
4. Verify Admin Consent
-
Refresh the page and check the API permissions section.
-
Ensure all permissions show Granted for <Tenant Name> in the Status column.
-
If any permissions are missing, repeat the steps.
📷 [Screenshot slot: Grant admin consent — Granted status]
Step 4: Assigning Roles at the Management Group Level
Using Azure Portal:
-
Go to Management Groups.
-
Click on the top-level management group (where "Type" is "Management group").
-
Click Access management (IAM) on the left menu.
-
Click Add role assignment.
-
Under Members, select the app registration.
-
Search for the app registration name and select it.
-
Click Review and assign.
-
Validate the assignment under the Role assignments tab.
Assign the following roles:
-
Reader (Read-only permission for resources on Subscription under management group)
-
Security Reader (Required to read Azure Defender for Cloud alerts)
📷 [Screenshot slot: Management Group role assignment]
Step 5: Generate a Client Secret
Using Azure Portal:
-
Go to Certificates & secrets.
-
Click New client secret.
-
Enter a description (e.g.,
AiStrikeAppSecret) and choose an expiration period. -
Click Add.
-
Copy the Value immediately; it won't be visible later.
📷 [Screenshot slot: Certificates & secrets — client secret]
Step 6: Validate and Use the App Registration
Retrieve Application Details via CLI or go to App Registration > Locate and click on the newly created App Registration (e.g., AiStrikeAppRegistration) > Overview page.
Using Azure CLI:
az ad app list --display-name "AiStrikeAppRegistration"

echo "=== App ID (Client ID) ==="
az ad app list --display-name "AiStrikeAppRegistration" --query "[0].appId" -o tsv

echo "=== Tenant ID ==="
az account show --query tenantId -o tsv
-
Azure Portal or Terraform Access
You can perform these steps via the Azure Portal or Terraform.
Terraform Setup
To automate the creation of the App Registration and assign the necessary permissions, apply the Terraform script provided below:
provider "azurerm" {
  features {}

  # ID of subscription where App registration will be created
  subscription_id = "12345678-1234-1234-1234-123456789abc"
}

module "aistrike_app" {
  source = "https://aistrike-terraform-modules.s3.us-east-1.amazonaws.com/azure-onboarding.zip"

  # Pass either management_group_ids or subscription_ids
  # management_group_ids = ["mg-example-group"]
  subscription_ids = ["12345678-1234-1234-1234-123456789abc"]
}

output "client_id" {
  value = module.aistrike_app.client_id
}

output "client_secret" {
  value = module.aistrike_app.client_secret
}

output "tenant_id" {
  value = module.aistrike_app.tenant_id
}
Ensure admin_consent is granted after applying the script. [Steps for Admin Grant]
Terraform-Based Steps
Use Terraform to automate the above steps. The Terraform script should include:
-
App Registration creation
-
Assigning API permissions
-
Assigning RBAC roles at the Management Group level
-
Generating a client secret
-
The Client ID (Application (client) ID) & Client Secret will be displayed in the Terraform output.
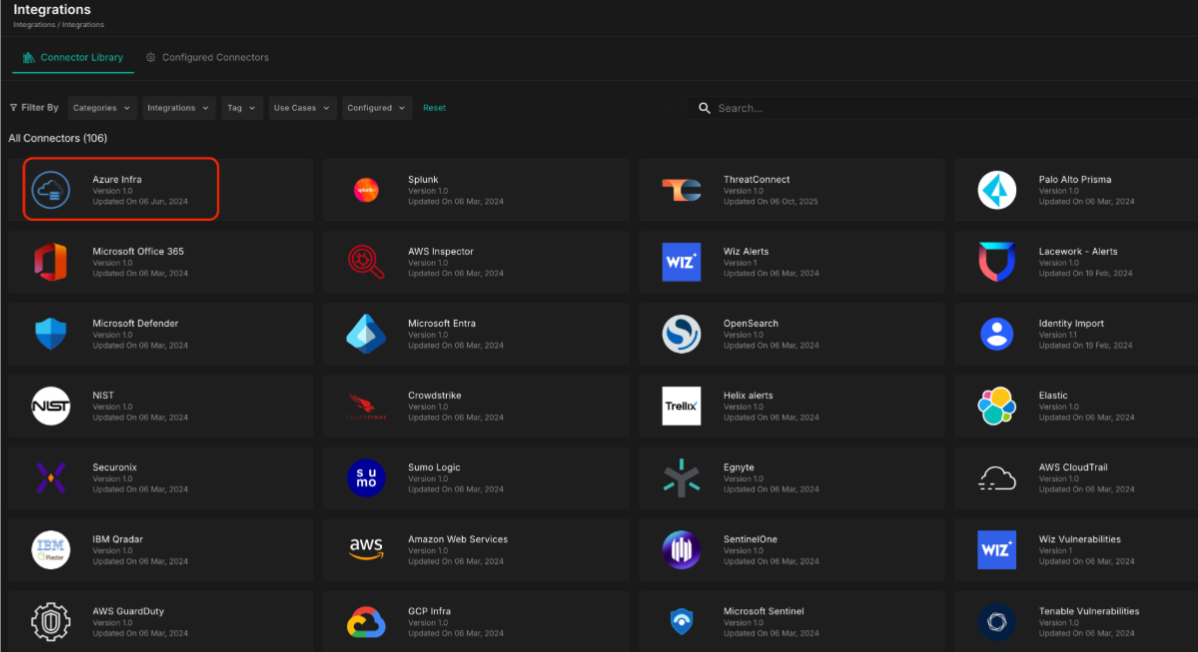
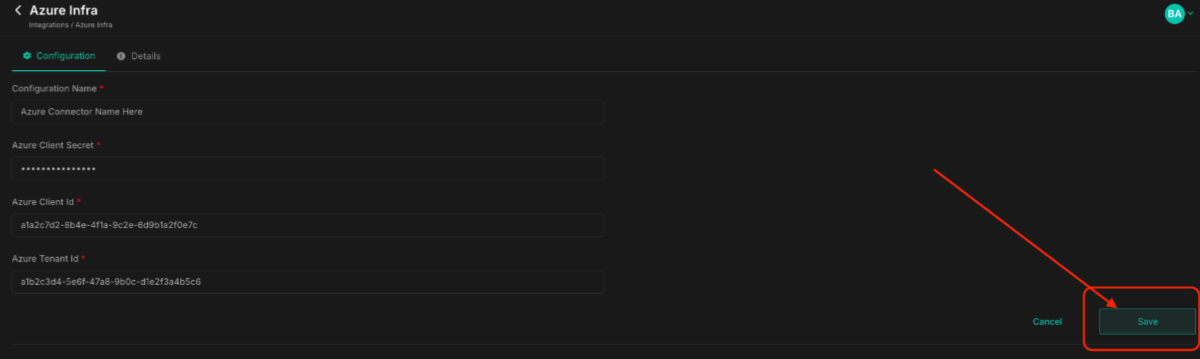
Step 7: Once completed, add the Client Secret, Client ID, and Tenant ID to the AiStrike Integrations Connector.
Upon successful configuration
-
You would start seeing data in Inventory for your Azure environment, populating in the next few hours.
After the integration is configured, all future alerts from Microsoft Defender and other security services will be available in the AiStrike application as per the configured permission list (Section: Assign API Permissions).